DIY: Industrial Pipe Coat Rack
Decorating your home with items made from industrial piping seems to be all the rage right now. There are even kits out there so you don't need to sort through all the piping at the home improvement store. However, some of these kits seem to come at a premium. I've also seen these coat racks for around $80 on Etsy. While they do take some time to build, they're VERY EASY to make. You can make your own for around $30. I've included an Amazon link to each part but they seem to be much more than the hardware store.
Parts List:
All piping is 1/2 inch black steel
4 - 1 inch close
4 - Floor flanges
4 - 90 degree Street elbows
4 - End Caps
1- 1x4 - 27" in length (or if you have some reclaimed wood, use that)
1- Can of Stain
8 - 3/4" wood screws
Optional - Rust-Oleum Oil Rubbed Bronze Metallic Spray paint
Head to the piping section and pick up the following in 1/2 inch black steel pipe:
4: 1 inch (length) nipples
4: Floor flanges
4: Street elbows
4: End Caps
Be sure to get street elbows so you'll have a threading on the outside for the end cap to attach to and a threading on the inside for the nipple to attach to.
They'll attach together as shown in the following pictures:
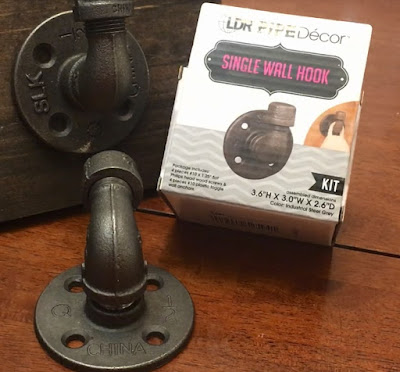
You might also notice the piping company, LDR, sells a kit for a single wall hook with all the included mounting hardware.
I ended up buying 4 of these wall hook kits rather than buying each section of piping individually. At the time, they were $7 each. The last time I checked, they were in stock but not displayed in the store. You may have to order online and use the "Pick Up in Store" option.
Then I picked up a 1x4 and headed over to the paint department to pick out a stain. I thought a darker stain would look better so I went with Minwax Espresso stain. (Sorry about the glare)
Before staining, I roughed up the 1x4 with a hand planer and a hammer. You don't need to do this but I thought it would give the rack a worn look. Oh, I also sanded the edges with an orbital sander.
I used two coats of stain on the front and one coat on the back. I forgot to sand in between coats so, I only sanded after the second coat on the front and didn't sand the back...since no one will see it.
After staining and drying I figured out the spacing of the hooks. Measure from the top and bottom to figure out the vertical spacing. Once you find this line, use a yard stick to figure out the horizontal spacing. The spacing works out pretty even. The hooks on the outside are 3 inches apart from the edge. Each flange is 3" in diameter so, I left 3" between each hook which meant 6" between the center of each.
I did not use the provided screws since I wasn't mounting the hook directly into the wall. I used a shorter wood screw and spray painted the tops with the Rust-Oleum Oil Rubbed Bronze Metallic Spray paint. I happened to have this on hand and it was close enough to the color of the piping for me.
My wood was soft enough to screw directly into the wood without drilling. If you use a hardwood or decide to drill, you'll probably just need a small pilot hole. I only used two screws on each hook since I was planning on using the additional holes to secure it to the wall.
This build was very easy, it spanned over 2 days but only involved about an hour of work. If you're looking for a pipe project for your house, this would be the perfect place to start.
Disclaimer: We are a participant in the Amazon Services LLC Associates Program, an affiliate advertising program designed to provide a means for us to earn fees by linking to Amazon.com and affiliated sites.


